
Tutorial 7: Leave your Mark
- Aug 21, 2018
- 3 min read
Power Up and Collectible: Lesson Seven
With this tutorial we are going to make an Asset to Leave a Mark,
To make something that is in a lot of Mobile Games....A Spray Can
Step 1: To start with Create A Rectangle (With The Square tool as in Previous Lessons), Then we need to Convert it to a Custom Shape with CTRL + SHIFT + C. Then Shift + Left Click the Bottom 2 Nodes of the Rectangle, And Hit the Add Node Button (As in the Picture Below). This will Create a Node in the Centre of the 2 Bottom Nodes. Drag this Middle Node down by Selecting it and Holding CTRL will Keep it on it's Axis. Then with the Node still selected Hit the Curve Node Button (As below). Then Drag out the Handles abit (Holding CTRL) to make the Shape below.

Step 2: Then make a Oval shape with the Circle tool like below. Put it behind the rectangle Shape with Page Down.

Step 3: Then make another Oval Shape, Convert it to the Path (CTRL + SHIFT + C) and Select the 2 Nodes like below. Drag them down a bit to make the shape below (Holding CTRL)

Step 4: Make another Circle/Oval shape with the Circle Tool. Place it behind the Rectangle like the Picture Below. It should be Flush with the Rectangle Sides

Step 5: Now create a Rectangle Shape to make the Nozzle of the Cap, And again Select the Top 2 Nodes, And Add a Center Node with the Add Node (Like Step 2) And Curve that Node also. Pull out the Handle again and make a Shape like the Below Shape.

Step 6: Now add a Little Circle to the Cap of the Can, Duplicate it and Scale down another one to make a Smaller Circle inside of the Bigger one. You can also Just use the Circle tool again.

Step 7: Duplicate the 2nd Oval Shape on the Can, And Place it like the Picture Below. Then Select everything (Dragging mouse over it all) and Add an Outline (Hold Shift and Click the Black Colour at the Bottom, Or do it with the Colour Wheel, Like Previous Lessons).

Step 8: With all the Parts Selected, Duplicate them all and Union them like Previous Lessons (Path in the Top Menu and then Union). This Will make a Whole Shape, Change the Outline to a Thicker outline (In the Colour Wheel Tool, Stroke Style) and then remove the Fill of the Object. This should make a Thick outline around your can.

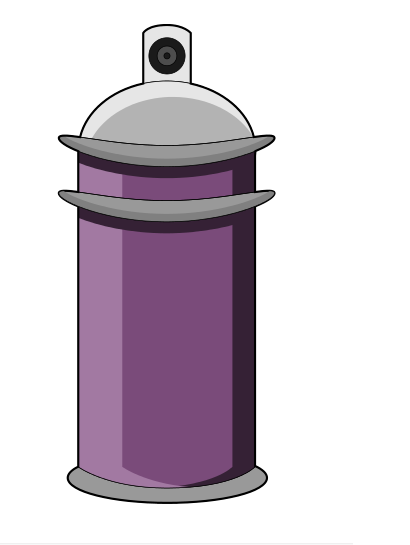
Step 9: Now you can add Colour to your Can like the Below Picture, Or any other Colour you would like.

Step 10: Duplicate the 2 Oval Rings around the Can and Make them a Darker Colour to your Can. Then Drag them down a bit, Like the Picture below. Then Duplicate the Can Shape and Intersect the Shadow Rings one at a time (Path again, And Intersection). Then move the Shape below the outline with Page Down. Do this for Both Shadows.

Step 11: Now for Highlights, Change the Cap to A lighter Colour, and Duplicate the Top of the Can Circle Twice, Move the Second Copy down a bit and Difference it (Again Path, Then Difference). Change that to a Lighter Colour also, And move behind the Outline with Page down.

Step 12: Now the Highlights for the Rings, We just repeat the Above Step, But with the Ring Shapes instead. Duplicate Twice, Drag the Second one Down a bit and Difference it. Change the Colour to a Lighter Colour. Do this 2 Both of the Rings

Step 13: Now Highlights for the Can, Duplicate the Can Shape, Then Duplicate again, And Move it to a Position like the Picture Below. Then Difference that. Change it to a Lighter Shade of your Can Colour

Step 14: Now the Shadow of the Can of the Other Side, Just Repeat the Same Step for the Highlights, But Move the 2nd Duplicate to the Left instead of the Right. If you like you can duplicate the Highlight, Then Mirror it with the H Key, Then change it to a Darker Can Colour.
Step 15: Now the last part is Add the Shadow to the bottom of the Nozzle/Cap. To do this Just Create a Duplicate of the Circle Nozzle Shape, Change it to a Darker Grey Colour and Remove the Stroke in the Colour Wheel Tool. Then Move it behind the Nozzle with Page Down

And there you have it!
You have now created your Another Collectible or Power Up for your Game!
Great work and look at tackling some more of these!
You can Donate $0.99 to also get the SVG for this Lesson,
To study how I have done it.
Thanks for doing this Lesson
Daniel
WRGFX


Comments